

Learn DB Concepts with me...
Oracle EXPDP commands
The expdp (Data Pump Export) utility is used to export data and metadata from an Oracle database. It provides several command-line options to customize the export process. Below are some common expdp commands and their explanations:
Basic Syntax:
expdp [username/password] DIRECTORY=directory_name DUMPFILE=dumpfile_name LOGFILE=logfile_name [options]
Common Expdp Commands:
- Export a Full Database:
expdp system/password FULL=Y DIRECTORY=dpump_dir DUMPFILE=full_db.dmp LOGFILE=full_db.log
- FULL=Y: Exports the entire database.
- Export a Specific Schema:
expdp system/password SCHEMAS=schema_name DIRECTORY=dpump_dir DUMPFILE=schema.dmp LOGFILE=schema.log
- SCHEMAS=schema_name: Exports a specific schema.
- Export Specific Tables:
expdp system/password TABLES=table1,table2 DIRECTORY=dpump_dir DUMPFILE=tables.dmp LOGFILE=tables.log
- TABLES=table1,table2: Exports specific tables.
- Export a Specific Table with Data and Metadata:
expdp system/password TABLES=table_name DIRECTORY=dpump_dir DUMPFILE=table.dmp LOGFILE=table.log
- TABLES=table_name: Exports a specific table.
- Export with Compression:
expdp system/password FULL=Y DIRECTORY=dpump_dir DUMPFILE=full_db.dmp LOGFILE=full_db.log COMPRESSION=ALL
- COMPRESSION=ALL: Compresses all data during export.
- Export with Data Filtering (e.g., Export Data from a Specific Date):
expdp system/password TABLES=table_name DIRECTORY=dpump_dir DUMPFILE=table.dmp LOGFILE=table.log QUERY=table_name:"WHERE created_date > TO_DATE('2024-01-01', 'YYYY-MM-DD')"
- QUERY=table_name:"WHERE condition": Filters rows based on a condition.
- Export Metadata Only:
- expdp system/password FULL=Y DIRECTORY=dpump_dir DUMPFILE=metadata.dmp LOGFILE=metadata.log CONTENT=METADATA_ONLY
- CONTENT=METADATA_ONLY: Exports only metadata (no data).
- Export Data Only:
expdp system/password FULL=Y DIRECTORY=dpump_dir DUMPFILE=data_only.dmp LOGFILE=data_only.log CONTENT=DATA_ONLY
- CONTENT=DATA_ONLY: Exports only data (no metadata).
- Export a Database with a Specific Date Format:
expdp system/password FULL=Y DIRECTORY=dpump_dir DUMPFILE=full_db.dmp LOGFILE=full_db.log PARALLEL=4
- PARALLEL=4: Uses 4 parallel threads for faster export.
- Export with a Job Name:
expdp system/password FULL=Y DIRECTORY=dpump_dir DUMPFILE=full_db.dmp LOGFILE=full_db.log JOB_NAME=export_full_db
- JOB_NAME=export_full_db: Assigns a name to the export job.
Additional Parameters:
- CONTENT: Specifies whether to export metadata only (METADATA_ONLY), data only (DATA_ONLY), or both (ALL).
- EXCLUDE: Excludes specific objects or object types from the export. Example: EXCLUDE=TABLE:"='table_name'".
- INCLUDE: Includes specific objects or object types in the export. Example: INCLUDE=TABLE:"IN ('table1', 'table2')".
- REMAP_SCHEMA: Remaps schema names. Example: REMAP_SCHEMA=old_schema:new_schema.
- REMAP_TABLESPACE: Remaps tablespace names. Example: REMAP_TABLESPACE=old_tablespace:new_tablespace.
Directory Object:
Before running expdp, ensure that the DIRECTORY object exists in the database and points to a valid filesystem directory where the dump files will be written.
CREATE OR REPLACE DIRECTORY dpump_dir AS '/path/to/directory';
Example Execution:
To execute an expdp command, open a command prompt or terminal and run the appropriate expdp command based on your requirements. Ensure you have the necessary privileges and that the Oracle environment variables (ORACLE_HOME and PATH) are set correctly.
Conclusion:
The expdp utility offers powerful options for exporting data and metadata from Oracle databases. By using the appropriate parameters and options, you can tailor the export process to meet specific needs and optimize performance.
Identify and Terminate Sessions in oracle
Invoke SQL*Plus:
First, open SQL*Plus to begin the process.
Query V$SESSION to Identify the Session:
Use the following query to retrieve the session details. This will list all active sessions with their respective SID, SERIAL#, STATUS, SCHEMANAME, and PROGRAM.
SELECT SID, SERIAL#, STATUS, SCHEMANAME, PROGRAM FROM v$session;
The SID (Session Identifier) and SERIAL# values of the Oracle session to be killed can then be identified from this output.
Execute the ALTER SYSTEM Command:
Substitute the identified SID and SERIAL# values and issue the alter system kill session command.
ALTER SYSTEM KILL SESSION 'sid,serial#';
Handling Sessions Marked for Kill:
Sometimes, Oracle is not able to kill the session immediately with the alter system kill session command alone. Upon issuing the command, the session may be 'marked for kill' and will be terminated as soon as possible.
Forcing Session Termination:
In the case where a session is 'marked for kill' and not terminated immediately, you can force the termination by adding the immediate keyword:
ALTER SYSTEM KILL SESSION 'sid,serial#' IMMEDIATE;
Verify Termination:
To ensure that the session has been terminated, re-query the V$SESSION dynamic performance view:
SELECT SID, SERIAL#, STATUS, SCHEMANAME, PROGRAM FROM v$session WHERE SID = 'sid' AND SERIAL# = 'serial#';
The value of the STATUS column will be 'ACTIVE' when the session is making a SQL call and 'INACTIVE' if it is not.
Confirm PMON Cleanup:
After the Process Monitor (PMON) has cleaned up the session, the row will be removed from V$SESSION. Re-query to confirm:
SELECT SID, SERIAL#, STATUS, SCHEMANAME, PROGRAM FROM v$session WHERE SID = 'sid' AND SERIAL# = 'serial#';
Handling RAC Environments:
In a Real Application Clusters (RAC) environment, you can optionally specify the INST_ID, which is shown when querying the GV$SESSION view. This allows you to kill a session on a different RAC node.
ALTER SYSTEM KILL SESSION 'sid,serial#,@inst_id';
By following these detailed steps, you can efficiently identify and terminate a session using SQL*Plus, ensuring minimal disruption and maintaining database integrity.
import a single table from a full export backup in oracle
import a single table from a full export backup and remap it
impdp USERNAME/PASSWORD tables=SCHEMA.TABLE_NAME directory=DPUMP dumpfile=DUMPFILE_%U.dmp
remap_schema=SOURCE:TARGET
REMAP_TABLE=TABLE_NAME:TABLE_NAME_NEW
Optional things above :
- Remove remap if you don't want.
- Add ENCRYPTION_PASSWORD=IF_ANY
Restore archivelogs from RMAN backup
rman> restore archivelog from logseq=37501 until logseq=37798 thread=1;
or
rmna> restore archivelog between sequence 37501 and 37798 ;
Setting up Optach environment variable
Setting up Optach environment variable :
% export PATH=$PATH:$ORACLE_HOME/OPatch
Simple password encryption package to demonstrate how
rem Purpose: Simple password encryption package to demonstrate how
rem values can be encrypted and decrypted using Oracle's
rem DBMS Obfuscation Toolkit
rem Note: Connect to SYS AS SYSDBA and run ?/rdbms/admin/catobtk.sql
rem Author: Frank Naude, Oracle FAQ
rem -----------------------------------------------------------------------
---- create table to store encrypted data
-- Unable to render TABLE DDL for object ATOORPU.USERS_INFO with DBMS_METADATA attempting internal generator.
CREATE TABLE USERS_INFO
(
USERNAME VARCHAR2(20 BYTE)
, PASS VARCHAR2(20 BYTE)
)users;
-----------------------------------------------------------------------
CREATE OR REPLACE PACKAGE PASSWORD AS
function encrypt(i_password varchar2) return varchar2;
function decrypt(i_password varchar2) return varchar2;
END PASSWORD;
/
show errors
CREATE OR REPLACE PACKAGE BODY PASSWORD AS
-- key must be exactly 8 bytes long
c_encrypt_key varchar2(8) := 'key45678';
function encrypt (i_password varchar2) return varchar2 is
v_encrypted_val varchar2(38);
v_data varchar2(38);
begin
-- Input data must have a length divisible by eight
v_data := RPAD(i_password,(TRUNC(LENGTH(i_password)/8)+1)*8,CHR(0));
DBMS_OBFUSCATION_TOOLKIT.DESENCRYPT(
input_string => v_data,
key_string => c_encrypt_key,
encrypted_string => v_encrypted_val);
return v_encrypted_val;
end encrypt;
function decrypt (i_password varchar2) return varchar2 is
v_decrypted_val varchar2(38);
begin
DBMS_OBFUSCATION_TOOLKIT.DESDECRYPT(
input_string => i_password,
key_string => c_encrypt_key,
decrypted_string => v_decrypted_val);
return v_decrypted_val;
end decrypt;
end PASSWORD;
/
show errors
-- Test if it is working...
select password.encrypt('PASSWORD1') from dual;
select password.decrypt(app_password.encrypt('PASSWORD1')) from dual;
select password.encrypt('PSW2') from dual;
select password.decrypt(app_password.encrypt('PSW2')) from dual;
--- Insert encrypted Password ---
insert into USERS_INFO values ('redddy',( select password.encrypt('REDDY1') from dual) );
select password.decrypt((pass)) from USERS_INFO where USERNAME='redddy';
update rows from multiple tables (correlated update)
Cross table update (also known as correlated update, or multiple table update) in Oracle uses non-standard SQL syntax format (non ANSI standard) to update rows in another table. The differences in syntax are quite dramatic compared to other database systems like MS SQL Server or MySQL.
In this article, we are going to look at four scenarios for Oracle cross table update.
Suppose we have two tables Categories and Categories_Test. See screenshots below.
lets take two tables TABA & TABB:
Records in TABA:
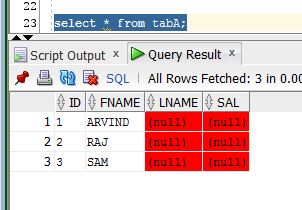
Records in TABB:

1. Update data in a column LNAME in table A to be upadted with values from common column LNAME in table B.
The update query below shows that the PICTURE column LNAME is updated by looking up the same ID value in ID column in table TABA and TABB.
update TABA A
set (a.LNAME) = (select B.LNAME FROM TABB B where A.ID=B.ID);

2. Update data in two columns in table A based on a common column in table B.
If you need to update multiple columns simultaneously, use comma to separate each column after the SET keyword.
update TABA A
set (a.LNAME, a.SAL) = (select B.LNAME, B.SAL FROM TABB B where A.ID=B.ID);

How to Secure our Oracle Databases
I am writing this post to share my experience and knowledge on securing databases. I personally follow below tips to secure my databases:
java.lang.SecurityException: The jurisdiction policy files are not signed by a trusted signer
I was trying to Install OID (Oracle Identity Manager) and I got this error :
Problem:
at oracle.as.install.engine.modules.configuration.standard.StandardConfigActionManager.start(StandardConfigActionManager.java:186)
at oracle.as.install.engine.modules.configuration.boot.ConfigurationExtension.kickstart(ConfigurationExtension.java:81)
at oracle.as.install.engine.modules.configuration.ConfigurationModule.run(ConfigurationModule.java:86)
at java.lang.Thread.run(Thread.java:745)
Caused by: java.lang.SecurityException: Can not initialize cryptographic mechanism
at javax.crypto.JceSecurity.<clinit>(JceSecurity.java:88)
... 31 more
Caused by: java.lang.SecurityException: The jurisdiction policy files are not signed by a trusted signer!
at javax.crypto.JarVerifier.verifyPolicySigned(JarVerifier.java:328)
at javax.crypto.JceSecurity.loadPolicies(JceSecurity.java:317)
at javax.crypto.JceSecurity.setupJurisdictionPolicies(JceSecurity.java:262)
at javax.crypto.JceSecurity.access$000(JceSecurity.java:48)
at javax.crypto.JceSecurity$1.run(JceSecurity.java:80)
at java.security.AccessController.doPrivileged(Native Method)
at javax.crypto.JceSecurity.<clinit>(JceSecurity.java:77)
Cause:
My current version of java was 1.8.* which is not fully supported.
In this case JDK 1.8.0.1 is installed on all nodes in the cluster and JCE local policy version 6 was used for AES 256 kerberos encryption. JCE must be in sync with the JDK version.
[oracle@linux06 jdk1.8.0_111]$ cd ..
[oracle@linux06 java]$ ls
default jdk1.8.0_111 latest
[oracle@linux06 java]$ cd default/
[oracle@linux06 default]$ ls
bin javafx-src.zip man THIRDPARTYLICENSEREADME-JAVAFX.txt
COPYRIGHT jre README.html THIRDPARTYLICENSEREADME.txt
db lib release
include LICENSE src.zip
Solution:
Download :
For Java 6 use :
http://www.oracle.com/technetwork/java/javase/downloads/jce-6-download-429243.html
For Java 7 use :
http://www.oracle.com/technetwork/java/javase/downloads/jce-7-download-432124.html
For java 8 use :
http://www.oracle.com/technetwork/java/javase/downloads/jce8-download-2133166.html
******************** ******************** ********************
Update java with with new java unlimted jusrisdiction :
******************** ******************** ********************
After download and unzip :
[oracle@linux06 JCE]$ unzip jce_policy-8.zip
Archive: jce_policy-8.zip
creating: UnlimitedJCEPolicyJDK8/
inflating: UnlimitedJCEPolicyJDK8/local_policy.jar
inflating: UnlimitedJCEPolicyJDK8/README.txt
inflating: UnlimitedJCEPolicyJDK8/US_export_policy.jar
[oracle@linux06 JCE]$ ls -ll
total 16
-rw-rw-r--. 1 oracle oracle 8409 Dec 14 10:39 jce_policy-8.zip
drwxrwxr-x. 2 oracle oracle 4096 Dec 20 2013 UnlimitedJCEPolicyJDK8
[oracle@linux06 JCE]$ pwd
/u01/app/SFTW/JCE
[oracle@linux06 JCE]$ ls
jce_policy-8.zip UnlimitedJCEPolicyJDK8
[oracle@linux06 JCE]$ cd UnlimitedJCEPolicyJDK8/
[oracle@linux06 UnlimitedJCEPolicyJDK8]$ ls
local_policy.jar README.txt US_export_policy.jar
******************** ******************** ********************
as root user backup and replace files (US_export_policy & local_policy.jar)
******************** ******************** ********************
[oracle@linux06 security]$ su root
Password:
[root@linux06 security]# ls
blacklist java.policy local_policy.jar
blacklisted.certs java.security trusted.libraries
cacerts javaws.policy US_export_policy.jar
[root@linux06 security]# cd /usr/java/default/jre/lib/security
[root@linux06 security]# mv US_export_policy.jar US_export_policy.jar_bak
[root@linux06 security]# mv local_policy.jar local_policy.jar_bak
[root@linux06 security]# ls -ll
total 164
-rw-r--r--. 1 root root 4054 Sep 22 18:23 blacklist
-rw-r--r--. 1 root root 1273 Sep 22 18:23 blacklisted.certs
-rw-r--r--. 1 root root 112860 Sep 22 18:23 cacerts
-rw-r--r--. 1 root root 2466 Sep 22 18:23 java.policy
-rw-r--r--. 1 root root 27358 Sep 22 18:23 java.security
-rw-r--r--. 1 root root 98 Sep 22 18:23 javaws.policy
-rw-r--r--. 1 root root 3405 Sep 22 18:35 local_policy.jar_bak
-rw-r--r--. 1 root root 0 Sep 22 18:23 trusted.libraries
-rw-r--r--. 1 root root 2920 Sep 22 18:35 US_export_policy.jar_bak
[root@linux06 security]# pwd
/usr/java/default/jre/lib/security
[root@linux06 security]# cp /u01/app/SFTW/JCE/UnlimitedJCEPolicyJDK8/US_export_policy.jar /usr/java/default/jre/lib/security
[root@linux06 security]# cp /u01/app/SFTW/JCE/UnlimitedJCEPolicyJDK8/local_policy.jar /usr/java/default/jre/lib/security
[root@linux06 security]# ls -ll
total 172
-rw-r--r--. 1 root root 4054 Sep 22 18:23 blacklist
-rw-r--r--. 1 root root 1273 Sep 22 18:23 blacklisted.certs
-rw-r--r--. 1 root root 112860 Sep 22 18:23 cacerts
-rw-r--r--. 1 root root 2466 Sep 22 18:23 java.policy
-rw-r--r--. 1 root root 27358 Sep 22 18:23 java.security
-rw-r--r--. 1 root root 98 Sep 22 18:23 javaws.policy
-rw-r--r--. 1 root root 3035 Dec 14 10:47 local_policy.jar
-rw-r--r--. 1 root root 3405 Sep 22 18:35 local_policy.jar_bak
-rw-r--r--. 1 root root 0 Sep 22 18:23 trusted.libraries
-rw-r--r--. 1 root root 3023 Dec 14 10:46 US_export_policy.jar
-rw-r--r--. 1 root root 2920 Sep 22 18:35 US_export_policy.jar_bak
bash: /bin/install/.oui: No such file or directory
Problem:
[oracle@linux5 database]$ . runInstaller
bash: /bin/install/.oui: No such file or directory
[oracle@linux5 database]$ uname -a
Linux linux5 3.8.13-16.2.1.el6uek.x86_64 #1 SMP Thu Nov 7 17:01:44 PST 2013 x86_64 x86_64 x86_64 GNU/Linux
Solution:
[oracle@linux5 database]$ ./runInstaller
Starting Oracle Universal Installer...
Checking Temp space: must be greater than 120 MB. Actual 20461 MB Passed
Checking swap space: must be greater than 150 MB. Actual 4031 MB Passed
Checking monitor: must be configured to display at least 256 colors. Actual 16777216 Passed
Preparing to launch Oracle Universal Installer from /tmp/OraInstall2016-11-22_09-46-02AM. Please wait ...[oracle@linux5 database]$
uninstall java on linux
This will also take care of dependent rpms.
[root@linux06 usr]# yum remove jdk1.8.0_111-1.8.0_111-fcs.i586
Loaded plugins: refresh-packagekit, security
Setting up Remove Process
Resolving Dependencies
--> Running transaction check
---> Package jdk1.8.0_111.i586 2000:1.8.0_111-fcs will be erased
--> Processing Dependency: java for package: jna-3.2.4-2.el6.x86_64
--> Running transaction check
---> Package jna.x86_64 0:3.2.4-2.el6 will be erased
--> Finished Dependency Resolution
Dependencies Resolved
======================================================================================================================
Package Arch Version Repository Size
======================================================================================================================
Removing:
jdk1.8.0_111 i586 2000:1.8.0_111-fcs @/jdk-8u111-linux-i586 259 M
Removing for dependencies:
jna x86_64 3.2.4-2.el6 @anaconda-OracleLinuxServer-201311252058.x86_64/6.5 298 k
Transaction Summary
======================================================================================================================
Remove 2 Package(s)
Installed size: 259 M
Is this ok [y/N]: Y
Downloading Packages:
Running rpm_check_debug
Running Transaction Test
Transaction Test Succeeded
Running Transaction
Warning: RPMDB altered outside of yum.
Erasing : jna-3.2.4-2.el6.x86_64 1/2
Erasing : 2000:jdk1.8.0_111-1.8.0_111-fcs.i586 2/2
Verifying : 2000:jdk1.8.0_111-1.8.0_111-fcs.i586 1/2
Verifying : jna-3.2.4-2.el6.x86_64 2/2
Removed:
jdk1.8.0_111.i586 2000:1.8.0_111-fcs
Dependency Removed:
jna.x86_64 0:3.2.4-2.el6
Complete!
Is it safe to move/recreate alertlog while the database is up and running
Is it safe to move/recreate alertlog while the database is up and running??
It is totally safe to "mv" or rename it while we are running. Since chopping part of it out would be lengthly process, there is a good chance we would write to it while you are editing it so I would not advise trying to "chop" part off -- just mv the whole thing and we'll start anew in another file.
If you want to keep the last N lines "online", after you mv the file, tail the last 100 lines to "alert_also.log" or something before you archive off the rest.
[oracle@Linux03 trace]$ ls -ll alert_*
-rw-r-----. 1 oracle oracle 488012 Nov 14 10:23 alert_orcl.log
I will rename the existing alertlog file to something
[oracle@Linux03 trace]$ mv alert_orcl.log alert_orcl_Pre_14Nov2016.log
[oracle@Linux03 trace]$ ls -ll alert_*
-rw-r-----. 1 oracle oracle 488012 Nov 14 15:42 alert_orcl_Pre_14Nov2016.log
[oracle@Linux03 trace]$ ls -ll alert_*
Now lets create some activity that will need to update the alertlog.
[oracle@Linux03 bin]$ sqlplus / as sysdba
SQL*Plus: Release 12.1.0.2.0 Production on Mon Nov 14 16:23:02 2016
Copyright (c) 1982, 2014, Oracle. All rights reserved.
Connected to:
Oracle Database 12c Enterprise Edition Release 12.1.0.2.0 - 64bit Production
With the Partitioning, OLAP, Advanced Analytics and Real Application Testing options
SQL> alter system switch logfile;
System altered.
SQL> /
lets see if the new alertlog file has been created.[oracle@Linux03 trace]$ ls -ll alert_*
-rw-r-----. 1 oracle oracle 249 Nov 14 16:23 alert_orcl.log
-rw-r-----. 1 oracle oracle 488012 Nov 14 15:42 alert_orcl_Pre_14Nov2016.log
querying directory permissions granted to a user
SELECT grantee, table_name directory_name, LISTAGG(privilege, ',') WITHIN GROUP (ORDER BY grantee)
FROM dba_tab_privs
WHERE table_name ='DPUMP' group by GRANTEE,TABLE_NAME;
SAMPLE output:
GRANTEE DIRECTORY_NAME GRANTS
-------------------- ------------------------------ --------------------
SCOTT DPUMP READ,WRITE
TIGER DPUMP READ,WRITE
TOM DPUMP READ,WRITE
CAM DPUMP READ,WRITE
SAM DPUMP READ,WRITE
Failed to auto-stop Oracle Net Listener using ORACLE_HOME/bin/tnslsnr
Usage : we can use dbshut script file in $ORACLE_HOME/bin to shutdown database & listener.
[oracle@Linux03 bin]$ ps -ef|grep pmon
oracle 20693 1 0 10:57 ? 00:00:00 ora_pmon_orcl
oracle 21133 19211 0 11:01 pts/0 00:00:00 grep pmon
[oracle@Linux03 bin]$ dbshut
Processing Database instance "orcl": log file /u01/app/oracle/product/12.1.0.2/db_1/shutdown.log
[oracle@Linux03 bin]$ ps -ef|grep pmon
oracle 21287 19211 0 11:09 pts/0 00:00:00 grep pmon
[oracle@Linux03 bin]$
Error : Failed to auto-stop Oracle Net Listener using ORACLE_HOME/bin/tnslsnr
[oracle@Linux03 bin]$ dbshut
Failed to auto-stop Oracle Net Listener using ORACLE_HOME/bin/tnslsnr
Solution (same as above): edit dbshut script and change
From : ORACLE_HOME_LISTNER=$1 To : ORACLE_HOME_LISTNER=$ORACLE_HOME Note :
One pre-req for this script to run is set 'Y' in /etc/oratab. This basically tell the script to start all database instance running of this home. while 'N' tells not to start db using dbshut script.
[oracle@Linux03 Desktop]$ grep 'orcl' /etc/oratab
orcl:/u01/app/oracle/product/12.1.0.2/db_1:Y
dbstart: line 275: ORACLE_HOME_LISTNER: command not found
Usage : we can use dbstart script file in $ORACLE_HOME/bin to start database & listener.
[oracle@Linux03 bin]$ ps -ef|grep pmon
oracle 20588 19211 0 10:56 pts/0 00:00:00 grep pmon
[oracle@Linux03 bin]$ dbstart
Processing Database instance "orcl": log file /u01/app/oracle/product/12.1.0.2/db_1/startup.log
[oracle@Linux03 bin]$ ps -ef|grep pmon
oracle 20693 1 0 10:57 ? 00:00:00 ora_pmon_orcl
oracle 21035 19211 0 10:57 pts/0 00:00:00 grep pmon
[oracle@Linux03 bin]$
Common error with dbstart script :
Error : /u01/app/oracle/product/12.1.0.2/db_1/bin/dbstart: line 275: ORACLE_HOME_LISTNER: command not found
[oracle@Linux03 bin]$ dbstart
/u01/app/oracle/product/12.1.0.2/db_1/bin/dbstart: line 275: ORACLE_HOME_LISTNER: command not found
Solution : Edit dbstart script and change (~ line 275)
From: ORACLE_HOME_LISTNER=$1
To : ORACLE_HOME_LISTNER=$ORACLE_HOMENote :
One pre-req for this script to run is set 'Y' in /etc/oratab. This basically tell the script to start all database instance running of this home. while 'N' tells not to start db using dbshut script.
[oracle@Linux03 Desktop]$ grep 'orcl' /etc/oratab
orcl:/u01/app/oracle/product/12.1.0.2/db_1:Y
expdp content=data_only
Export: Release 11.2.0.1.0 - Production on Wed Feb 11 10:58:23 2015
Copyright (c) 1982, 2009, Oracle and/or its affiliates. All rights reserved.
Connected to: Oracle Database 11g Enterprise Edition Release 11.2.0.1.0 - 64bit Production
With the Partitioning, OLAP, Data Mining and Real Application Testing options
Starting "ATEST"."SYS_EXPORT_TABLE_01": atest/******** directory=dpump dumpfile=test_tab1.dmp content=data_only tables=test_tab1 logfile=test_tab1.log
Estimate in progress using BLOCKS method...
Processing object type TABLE_EXPORT/TABLE/TABLE_DATA
Total estimation using BLOCKS method: 64 KB
. . exported "ATEST"."TEST_TAB1" 5.937 KB 11 rows
Master table "ATEST"."SYS_EXPORT_TABLE_01" successfully loaded/unloaded
******************************************************************************
Dump file set for ATEST.SYS_EXPORT_TABLE_01 is:
/u01/app/oracle/dpump/test_tab1.dmp
Job "ATEST"."SYS_EXPORT_TABLE_01" successfully completed at 10:58:26
[oracle@oracle1 dpump]$ clear
[oracle@oracle1 dpump]$ impdp atest2/password directory=dpump dumpfile=test_tab1.dmp content=data_only logfile=test_tab1_imp.log TABLE_EXISTS_ACTION=truncate remap_schema=atest:atest2
Import: Release 11.2.0.1.0 - Production on Wed Feb 11 10:58:50 2015
Copyright (c) 1982, 2009, Oracle and/or its affiliates. All rights reserved.
Connected to: Oracle Database 11g Enterprise Edition Release 11.2.0.1.0 - 64bit Production
With the Partitioning, OLAP, Data Mining and Real Application Testing options
Master table "ATEST2"."SYS_IMPORT_FULL_01" successfully loaded/unloaded
Starting "ATEST2"."SYS_IMPORT_FULL_01": atest2/******** directory=dpump dumpfile=test_tab1.dmp content=data_only logfile=test_tab1_imp.log TABLE_EXISTS_ACTION=truncate remap_schema=atest:atest2
Processing object type TABLE_EXPORT/TABLE/TABLE_DATA
. . imported "ATEST2"."TEST_TAB1" 5.937 KB 11 rows
Job "ATEST2"."SYS_IMPORT_FULL_01" successfully completed at 10:58:52
ORA-14074: partition bound must collate higher than that of the last partition
I have a table AUDIT_LOGONS, it has 5 partitions in it and one partition is defined as MAXVALUE. All partitions has some data (see below screen) in it except the MAXVALUE partition. Now I want to add a new partition which has date values less than 2016-05-31

But I am getting error ORA-14074
sql :
alter table AUDIT_LOGONS add partition AUDIT_LOGONS_P1 VALUES LESS THAN (TO_DATE(' 2016-05-31 00:00:00', 'SYYYY-MM-DD HH24:MI:SS'));
and I get this error :
SQL Error: ORA-14074: partition bound must collate higher than that of the last partition
14074. 00000 - "partition bound must collate higher than that of the last partition"
*Cause: Partition bound specified in ALTER TABLE ADD PARTITION
Solution 1:
We can add a sub-partition to the partition that was set with MAXVALUE (AUDIT_LOGONS5 in this case). In below sql we are modifying the partition audit_logons5 adding a sub-parition audit_logons6 which will have all the data which has date below "2016-09-30"
ALTER TABLE MONTHLY_SALES MODIFY PARTITION AUDIT_LOGONS5 ADD SUB-PARTITION AUDIT_LOGONS6 VALUES LESS THAN (TO_DATE('2016-09-30 00:00:00','SYYYY-MM-DD HH24:MI:SS','NLS_CALENDAR=GREGORIAN'));
Note : the partition can be renamed anytime
Solution 2 (This will not work for all):
One solution is to drop that Maxvalue (AUDIT_LOGONS5 in this case) partition if there is no data in it and then we can recreate another partitions with defined dates like below.
ALTER TABLE monthly_sales DROP PARTITION AUDIT_LOGONS5;
ALTER TABLE monthly_sales ADD PARTITION AUDIT_LOGONS5 VALUES LESS THAN (TO_DATE('2016-09-30 00:00:00','SYYYY-MM-DD HH24:MI:SS','NLS_CALENDAR=GREGORIAN'));
oracle real time apply on standby
- For physical standby databases, issue the ALTER DATABASE RECOVER MANAGED STANDBY DATABASE USING CURRENT LOGFILE statement.
- For logical standby databases, issue the ALTER DATABASE START LOGICAL STANDBY APPLY IMMEDIATE statement.
NOTE : Standby redo log files are required to use real-time apply.
Lets Test it:
oracle@ORCLSTDBY:[~] $ sqlplus /"as sysdba"
SQL*Plus: Release 11.2.0.4.0 Production on Tue Oct 4 10:57:52 2016
Copyright (c) 1982, 2013, Oracle. All rights reserved.
Connected to:
Oracle Database 11g Enterprise Edition Release 11.2.0.4.0 - 64bit Production
With the Partitioning, OLAP, Data Mining and Real Application Testing options
SQL> recover managed standby database cancel;
Media recovery complete.
SQL> select dest_name,status,type,srl,recovery_mode from v$archive_dest_status where dest_id=1;
DEST_NAME STATUS TYPE SRL RECOVERY_MODE
-------------------- ---------- ---------- --- ------------------------------
LOG_ARCHIVE_DEST_1 VALID LOCAL NO IDLE
-- Dest_id can be different in your database. but mostly it will be set to local.
-- Lets start applying logs and start the recovery mode Default (apply on log fill up)
SQL> recover managed standby database disconnect from session;
Media recovery complete.
-- Query the Recovery Mode now:
SQL> col DEST_NAME format A20
col status format A10
col type format A10
col recovery_mode format A30
select dest_name,status,type,srl,recovery_mode from v$archive_dest_status where dest_id=1;
DEST_NAME STATUS TYPE SRL RECOVERY_MODE
-------------------- ---------- ---------- --- ------------------------------
LOG_ARCHIVE_DEST_1 VALID LOCAL NO MANAGED
-- See that Recovery Mode will be just Managed.
-- Lets stop log Apply and change it the recovery mode to Real-Time Apply
SQL> recover managed standby database cancel;
Media recovery complete.
SQL> alter database recover managed standby database using current logfile disconnect from session;
Database altered.
SQL> select dest_name,status,type,srl,recovery_mode from v$archive_dest_status where dest_id=1;
DEST_NAME STATUS TYPE SRL RECOVERY_MODE
-------------------- ---------- ---------- --- ------------------------------
LOG_ARCHIVE_DEST_1 VALID LOCAL NO MANAGED REAL TIME APPLY
-- We can also check this in alertlog_File.log
Completed: ALTER DATABASE RECOVER managed standby database cancel
Tue Oct 04 11:00:47 2016
.
.
alter database recover managed standby database using current logfile disconnect from session
Attempt to start background Managed Standby Recovery process (ORCLSTDBY)
Tue Oct 04 11:00:47 2016
MRP0 started with pid=58, OS id=40557
MRP0: Background Managed Standby Recovery process started (ORCLSTDBY)
started logmerger process
Tue Oct 04 11:00:52 2016
Managed Standby Recovery starting Real Time Apply
Parallel Media Recovery started with 64 slaves
Waiting for all non-current ORLs to be archived...
Reference Oracle Docs:
https://docs.oracle.com/cd/B19306_01/server.102/b14239/log_apply.htm#i1034632
Similar Posts :
- How to add second standby database
- How to create Standby database using RMAN
- Open Standby Database in Read-Only
- Find Archive Gap between Primary and Standby Database
ALTER SYSTEM KILL SESSION
The alter system kill session command requires two unique arguments that uniquely identify the Oracle session, the session identifier and serial number.
First you have to identify the session to be killed with alter system kill session.
select SID,SERIAL#,STATUS,SCHEMANAME,PROGRAM from v$session;
The SID and SERIAL# values of the Oracle session to be killed can then be substituted and the alter system kill session command issued.
SQL> ALTER SYSTEM KILL SESSION 'sid,serial#';
Sometimes Oracle is not able to kill the session immediately with the alter system kill session command alone. Upon issuing the alter system kill session command, the session will be 'marked for kill'. It will then be killed as soon as possible.
In the case of a session being 'marked for kill' after issuing the alter system kill session command and not killed immediately, the alter system kill session command can be forced by adding the immediate keyword:
SQL> ALTER SYSTEM KILL SESSION 'sid,serial#' IMMEDIATE;
SQL> ALTER SYSTEM KILL SESSION 'sid,serial#,@inst_id';
Automate Kill SNIPED SESSION
If you have configured IDLE_TIME inr your user profile.
IDLE_TIME
Specify the permitted periods of continuous inactive time during a session, expressed in minutes. Long-running queries and other operations are not subject to this limit
Lets say a session has been idle for 10 Minutes. Session will continue to show as idle even after the idle_time for that user,as specified in that user's profile, has expired. When the user attempts to run a transaction against the database after the idle_time has expired, the database will disconnect the user by terminating the session. After this, the
session will no longer show in v$session. So, even if the session appears to be idle for a duration slightly more then your 10 minutes -- it is already "dead", it just doesn't show as dead yet. PMON will eventually snipe the session, marking it dead in v$session.
Reference this oracle Document for more information.
Once the oracle session is changed to SNIPED status, we can kill that session without any problem. How ever this be done manually, but watching for these SNIPED sessions every time can be irritating, we can automate the job of killing SNIPED session as below.
-- This is an optional table. Create this only if you want to Audit the killed session.
CREATE
TABLE "AUDIT_KILL_SNIPED_SESSIONS"
(
"SID" NUMBER,
"SERIAL#" NUMBER,
"TIME_STAMP" TIMESTAMP (6) DEFAULT SYSTIMESTAMP,
"USERNAME" VARCHAR2(50 BYTE)
)TABLESPACE "USERS" ;
Note : Inorder to create below procedure you will need DBA role & "ALTER SYSTEM" grant. If you are creating this procedure in non DBA user, you will need grant select on V$SESSION & "ALTER SYSTEM" grant
-- Procedure to kill sessions that are in sniped state
create or replace Procedure KILL_SNIPED_SESSIONS as
cursor SEL_SID is select SID,SERIAL#,USERNAME from v$session where status='SNIPED';
SEL_REC SEL_SID%ROWTYPE;
V_SQL varchar2(100);
V_SQL1 varchar2(100);
Begin
OPEN SEL_SID;
LOOP
FETCH SEL_SID INTO SEL_REC;
EXIT WHEN SEL_SID%NOTFOUND;
V_SQL :='ALTER SYSTEM KILL SESSION '''||SEL_REC.SID||','||SEL_REC.SERIAL#||''' IMMEDIATE';
-- DBMS_OUTPUT.PUT_LINE(V_SQL);
execute immediate V_SQL;
--- LETS AUDIT THE KILLED SESSIONS DATA HERE
-- COMMENT LINES BELOW THIS TO REMOVE AUDITING
V_SQL1:= 'insert INTO AUDIT_KILL_SNIPED_SESSIONS (SID,SERIAL#,USERNAME) VALUES ('''||SEL_REC.SID||''','''||SEL_REC.SERIAL#||''','''||SEL_REC.USERNAME||''')';
-- DBMS_OUTPUT.PUT_LINE(V_SQL1);
COMMIT;
execute immediate V_SQL1;
-- COMMENT UNTILL THIS LINE TO REMOVE AUDITING
END LOOP;
CLOSE SEL_SID;
END;
-- YOU CAN ALSO SETUP A JOB TO RUN EVERY 30 MINS OR HOUR TO EXECUTE THIS PROCEDURE
BEGIN
DBMS_SCHEDULER.CREATE_JOB (
job_name => '"EXEC_KILL_SNIPED_SESSIONS"',
job_type => 'STORED_PROCEDURE',
job_action => 'KILL_SNIPED_SESSIONS',
number_of_arguments => 0,
start_date => TO_TIMESTAMP_TZ('2016-09-29 13:07:38.837143000 AMERICA/CHICAGO','YYYY-MM-DD HH24:MI:SS.FF TZR'),
repeat_interval => 'FREQ=HOURLY',
end_date => NULL,
enabled => FALSE,
auto_drop => FALSE,
comments => 'Job to run KILL_SNIPED_SESSIONS procedure that kills SNIPED SESSIONOS ');
DBMS_SCHEDULER.SET_ATTRIBUTE(
name => '"EXEC_KILL_SNIPED_SESSIONS"',
attribute => 'logging_level', value => DBMS_SCHEDULER.LOGGING_OFF);
DBMS_SCHEDULER.enable(
name => '"EXEC_KILL_SNIPED_SESSIONS"');
END;
References :
http://arvindasdba.blogspot.com/2016/09/alter-system-kill-session.html